Sunday, December 18, 2011

French Onion Soup


It’s officially time to pull the Dutch oven off the shelf where it quietly rested all summer – we’ve got some work to do. 

Onions are one of those things that have grown on me as my palate has become more refined - aka older and less picky – particularly caramelized onions.  A little butter, a little olive oil, a pinch of sugar, couple pinches of salt, some patience (cue GNR’s whistling) and wow, serious flavor.  I could eat them just like that and sometimes do, but what’s the point when you can add delicious broth and a gooey cheese topper?  Sometimes you just crave gooey cheese.  


A friend and I were talking about French Onion soup the other day.  **Side note: I’ve recently had it at Central twice now and theirs is quite good, but I have yet to find any in the city better than Bistro Bis’.  Its amazing.**  The funny thing about our conversation was that my friend is a vegetarian and had no idea that the base of this soup is beef broth.  She was going on about how delicious it is and we agreed that it was the perfect thing on a cold day and WAM – I broke the news to her.  We had a good laugh considering she also eats bacon when I make it and my homemade chicken nuggets (will have to post about those soon – way healthier and tastier than anything you could ever buy).  So yeah, moral of the story is, CMcD = vegetarian schmegitarian.  Love ya!  J


I don’t follow a recipe for this, so below is basically just a listing of what ends up getting thrown in the pot.  You may like beef broth only, or chicken only, or less broth more onion – that’s the beauty of cooking yourself, you make it how you like it….but I do think my version is quite good.  So put on your comfy pants and your favorite plaid flannel shirt (fitted and buttoned all the way please), grab a bowl and enjoy!  

Ingredients
Serves 4-6

2 Tbsp olive oil
2 Tbsp unsalted butter
3 large yellow onions, cut in half then into slices about 1/8” thick
Few pinches kosher salt
Couple pinches sugar
4 cups beef broth
1 ½ - 2 cups chicken broth
¼ - ½ tsp dried thyme
Few shakes garlic powder
1 beef bouillon cube

Instructions

In a large dutch oven or heavy pot, melt the butter into the olive oil.  Add the onions and let them cook slowly on low-medium heat, stirring occasionally.  After about 3-4 minutes, add the salt and sugar and continue cooking and stirring until the onions become a golden brown color.  This will take about an hour or so.  Low and slow is the key, you don’t want them to get crispy at all.

When they’re golden brown, add the broth, thyme and garlic powder.  When warmed through, taste and determine if the bouillon is necessary.  I mix chicken and beef broth because I think the combination gives the soup a deeper, richer flavor, however I also like that punch of beef flavor, hence the one cube.  Be careful with added salt.  I try to buy low sodium broth so I can control the amount of salt myself.  The bouillon will add more though.  After the initial few pinches when cooking the onions, I didn’t need to add anymore.

Still early

Getting there
Sunday, December 4, 2011

Baking GALS Round 6 - Chubby Hubby Balls


Ok, so honestly, what got you to open this post – the name or the picture?  If the name, it may be time to question your moral character…no more than I am questioning my own right now.  Have no fear (or I apologize for the disappointment??) but there are no pictures of anything remotely inappropriate in this post.  These balls of sweet salty deliciousness (that’s what she said) were originally called Chubby Hubby Truffles, but of course I had to put my own twist on them.  J  Alright alright, mind-out-of-gutter, let’s get serious…


The blog I found this recipe on calls these Chubby Hubby Truffles because of their similarity to the Ben & Jerry’s ice cream flavor.  Sans ice cream, obvs.  They remind me of Hersey’s Take 5 bars, if you’ve ever had those.  Either one – delicious.  Basically, you combine peanut butter with some sugar and crushed up pretzels, roll it into balls, then dip them in chocolate.  I tried to add caramel as it seemed like that was the one thing that was missing, but it proved a little more difficult than I anticipated, namely because the melted caramel was hardening faster than I could dab each ball with it (stop laughing).  At any rate, I got lazy and gave up.  They’re great either way though and for this Baking GALS round I wanted to make something a little more unique for the guys that are stuck away from home during the holidays.  Enjoy fellas and thanks again for everything!

Naked!

Clothed - shew!

Recipe adapted from Brown Eyed Baker
Peanut Butter-Pretzel Truffles (a.k.a. Chubby Hubby Truffles)
Yield: About 18 truffles
Prep Time: 20 minutes | Chill Time: 1 hour, total

1½ cups pretzel pieces
½ cup creamy peanut butter
1 tablespoon unsalted butter, at room temperature
2 tablespoons light brown sugar
Pinch of salt
3 tablespoons powdered sugar
1 cup milk or semisweet chocolate chips
1 tablespoon vegetable shortening

1. Put the pretzel pieces into a resealable plastic bag and crush into very small bits using a rolling pin.
2. In a small bowl, combine the peanut butter, butter, brown sugar and salt. Stir until all of the ingredients are completely blended and smooth. Add the pretzel bits to the peanut butter mixture and mix thoroughly. Add the powdered sugar and mix until completely combined.
3. Line a small baking sheet with wax paper. Using a small cookie scoop, or about 2 teaspoons worth of peanut butter mixture, gently shape into a ball with your fingertips. Place the ball on the wax paper-lined cookie sheet and repeat with the remaining peanut butter mixture. Place the baking sheet into the refrigerator and chill for at least 30 minutes.
4. When ready to dip the truffles, microwave the chocolate chips and vegetable shortening together in a small bowl at 50% power in 30-second increments, stirring after each, until completely melted and smooth.
5. Working one at a time, dip one peanut butter-pretzel ball into the melted chocolate and use a fork to roll it around, ensuring that it is completely coated with chocolate. Let any extra chocolate drip off and place back on the wax paper-lined sheet. Repeat with all of the peanut butter-pretzel balls.
6. Return the baking sheet to the refrigerator and again chill for at least 30 minutes. Garnish with a drizzle of melted peanut butter and crushed pretzels, if desired. Store in an airtight container in the refrigerator.
**NOTE**  I found that this was not enough peanut butter for the balls to keep shape.  I recommend doubling what the recipe calls for.
Monday, November 21, 2011

MA!! THE MEATLOAF!!!!


I have seriously been craving meatloaf recently.  I know, weird craving.  Is this the 1930’s?  How old am I?? (peanut gallery please refrain from answering that question)  If you have ever tried this meatloaf recipe, you would totally understand the craving – it’s awesome.  I found it a few years ago from one of my old trusty cookbooks – Cooks Illustrated.  Why search the internet looking for a recipe that sounds good and probably ends up being only ok, when they’ve done all the testing for you and can definitively give you something you’ll want to make again and again? 

I love the Cook’s Illustrated method – they tell you about their testing process and why certain things work and others don’t.  They try different types of meat, different binding ingredients, different glazes, until they finally come up with the “perfect” dish.  Obviously any dish comes down to personal preference, but my track record with Cooks Illustrated/America’s Test Kitchen recipes leans heavily in their favor.

Their recipe uses all beef, which I appreciate as I am not a veal fan and most meatloaf mixes you find at the store combine beef, pork and veal.  But I didn’t use beef.  I opted for ground turkey this time.  Very very rarely would I do that as ground turkey is virtually flavorless.  I like it in chili, and until now, that’s been it.  Had I not just consumed a huge vat of homemade spaghetti sauce with ground beef, I definitely would have used that, but I felt like I needed a leaner meat, especially as we head into the holidays and overeating is sure to occur (thank goodness for all the running I’ll be doing in races for the next few weeks…hmmm, strategically planned??).  At any rate, it turned out pretty well.  I think I prefer the traditional beef, but I’m definitely glad I tried this as the craving has finally been satisfied. **Quick tasting note – when eating this, if you want extra sauce, go for plain ketchup rather than extra glaze.  The glaze tastes amazing with the beef version, but for some reason it’s a little too much with the turkey.**

For those of you not interested in the nitty gritty, ignore the insanely long list of ingredients below….but not until you check out this classic pic of the last time I made this:


From Cook’s Illustrated January/February 2006

Meatloaf
3 ounces Monterey Jack cheese , grated on small holes of box grater (about 1 cup)
1 tablespoon unsalted butter
1 medium onion , chopped fine (about 1 cup)
1 medium rib celery , chopped fine (about 1/2 cup)
1 medium clove garlic , minced or pressed through a garlic press (about 1 teaspoon)
2 teaspoons minced fresh thyme leaves
1 teaspoon paprika
1/4 cup tomato juice
1/2 cup low sodium chicken broth
2 large eggs
1/2 teaspoon unflavored gelatin (powdered)
1 tablespoons soy sauce
1 teaspoon Dijon mustard
2/3 cup crushed saltine crackers
2 tablespoons minced fresh parsley leaves
3/4 teaspoons table salt
1/2 teaspoon ground black pepper
1 pound ground sirloin (I substituted with 1lb 94% lean ground turkey and 1lb 99% lean ground turkey)
1 pound ground beef chuck

Glaze
1/2 cup ketchup
1 teaspoon hot pepper sauce (or a little extra vinegar and some ground cayenne pepper)
1/2 teaspoon ground coriander
1/4 cup cider vinegar
3 tablespoons packed light brown sugar


INSTRUCTIONS

1. Adjust oven rack to middle position; heat oven to 375 degrees. Spread cheese on plate and place in freezer until ready to use. Prepare baking sheet (see illustration below).

2. Heat butter in 10-inch skillet over medium-high heat until foaming; add onion and celery and cook, stirring occasionally, until beginning to brown, 6 to 8 minutes. Add garlic, thyme, and paprika and cook, stirring, until fragrant, about 1 minute. Reduce heat to low and add tomato juice. Cook, stirring to scrape up browned bits from pan, until thickened, about 1 minute. Transfer mixture to small bowl and set aside to cool.

3. Whisk broth and eggs in large bowl until combined. Sprinkle gelatin over liquid and let stand 5 minutes. Stir in soy sauce, mustard, saltines, parsley, salt, pepper, and onion mixture. Crumble frozen cheese into coarse powder and sprinkle over mixture. Add ground beef; mix gently with hands until thoroughly combined, about 1 minute. Transfer meat to foil rectangle and shape into 10 by 6-inch oval about 2 inches high. Smooth top and edges of meatloaf with moistened spatula. Bake until an instant-read thermometer inserted into center of loaf reads 135 to 140 degrees, 55 to 65 minutes. Remove meatloaf from oven and turn on broiler.

4. While meatloaf cooks, combine ingredients for glaze in small saucepan; bring to simmer over medium heat and cook, stirring, until thick and syrupy, about 5 minutes. Spread half of glaze evenly over cooked meatloaf with rubber spatula; place under broiler and cook until glaze bubbles and begins to brown at edges, about 5 minutes. Remove meatloaf from oven and spread evenly with remaining glaze; place back under broiler and cook until glaze is again bubbling and beginning to brown, about 5 minutes more. Let meatloaf cool about 20 minutes before slicing.

 
Tuesday, November 8, 2011

Baking GALS Round 5 - Double Chocolate Peanut Butter Cookies


You’d think it would be easy to come up with some new exciting thing to bake for my monthly shipment to the troops, but for some reason every month I have a mental baking roadblock.  Unfortunately, my creativity wasn’t piqued when the request from the recipient of this shipment was chocolate chip cookies and skittles.  Chocolate chip?  Not something more exciting?  Besides, I had just made a big batch.  I trust that someone else will handle that one.  So then I turned to the skittles...hmmm.  I had brainstorming sessions with a few different people – what could I do?  Put them in sugar cookies?  Melt them down and use them in some other fashion – is that even possible?  Too much to think about, so I opted to take the easy route out on those, I bought three different flavors and am tossing them in the box with the cookies.

Since I refused to couldn’t do plain chocolate chip, I went with the next best chip…peanut butter.  I knew exactly what cookie recipe to use, one from the trusted bakers at America’s Test Kitchen.  They have an AMAZING chocolate cookie recipe – in fact, they’re pretty much brownies in cookie form and what could possibly be wrong with that?  And that’s coming from someone who 9 times out of 10 would choose something fruity over chocolatey.

Take my advice – make these for the chocolate lover in your life, you’ll score some major points.  And nobody will miss plain old chocolate chip!

Recipe adapted from The Complete America’s Test Kitchen TV Show Cookbook

Ingredients
2 cups AP Flour
½ cup Dutch-processed cocoa powder (I use regular and have never had a complaint!)
2 tsp baking powder
½ tsp table salt
16 oz. semi-sweet chocolate (chopped or chips)
4 large eggs
2 tsp vanilla extract
2 tsp instant coffee or espresso powder
10 Tbsp unsalted butter, softened
½ cup granulated sugar
2 cups peanut butter chips (my addition)

Instructions
Mix the flour, cocoa, baking powder, salt and peanut butter chips in medium bowl and set aside.  Mix the eggs, vanilla and coffee powder in medium bowl and set aside.  Melt chocolate in double-boiler over just simmering water.  Set aside to cool slightly.

In a large bowl, cream the butter and sugars together.  The consistency will be grainy.  Gradually add the egg mixture and mix until incorporated.  Add the melted chocolate in a steady stream and mix well.  Gradually add the dry ingredients until just combined.

Cover dough with plastic wrap and let sit for 30 minutes to develop fudge-like texture.

Adjust oven racks to upper middle and lower middle positions and pre-heat the oven to 350º.  Scoop about 1 ½ - 2 Tbsp of dough, roll into a ball and place on parchment covered baking sheets about 1 ½ inches apart.  Bake two sheets at a time, rotating halfway through baking until edges have begun to set but centers are still very soft – about 8-10 minutes.  Cool on baking sheets for 10 minutes then transfer cookies to cooling racks to cool completely.


Thursday, October 27, 2011

Fall Preview


It's the end of October and I finally had my first butternut squash of the season.  I know I'm a little late to the game this year, but I'll make up for it in November... tonight's squash gave me the itch for more.

I've had this butternut sitting on my counter for about a week now and when I got home from the gym I was in a cooking mood.  I cut up half the squash in chunks and added my *special seasonings*.....let me tell ya, I can rock the hell out of a butternut.

With the other half I just cleaned it out, roasted it, added a few more ingredients, pureéd and voilá - soup!  Going to make for a great lunch tomorrow...

Now to tell you what's in this gorgeous salad:

Mixed baby greens
Thinly sliced onions that soaked in balsamic vinaigrette for about 10-15 minutes
Dried cranberries
Slices of honeycrisp apple
Pepitas
Roasted Butternut Squash
Balsamic Vinaigrette

The only thing missing was goat cheese which I forgot to get at the store - doh!  Still pretty freaking delicious...

Monday, October 10, 2011

Baking GALS Round 4 - Pumpkin Snickerdoodles


So it’s officially fall, and better yet, officially the best month of the year – yeah that’s right, October – you didn’t know?  Well consider yourself informed! J  Don’t get me wrong, I love a good hot sticky DC summer night and a warm breezy day on the beach, but when that cool crisp air rolls in and ridiculously delicious apples appear at the markets, you know it’s October and it’s awesome.

October also means pumpkin season, so for this month’s BakingGALS shipment I thought I’d give the guys a little taste of the season.  I know I have semi-bashed snickerdoodles before, claiming they are overdone/boring, but when I saw this recipe for a pumpkin version I knew I had to try it.  I love the texture of a snickerdoodle – soft and a little cakey – and we know I love cinnamon, so add pumpkin to that and voila, not so boring anymore!  The flavor of these cookies is subtle but satisfying – almost like a pumpkin pancake with the syrup baked in – and the pumpkin puree keeps the texture just right with a moist soft crumb.  Yum.  

Adapted from Annie's Eats (http://annies-eats.com/)
Ingredients:
For the cookies:
3¾ cups all-purpose flour
1½ tsp. baking powder
½ tsp. salt
½ tsp. ground cinnamon
¼ tsp. ground nutmeg
1 cup (2 sticks) unsalted butter, at room temperature
1 cup sugar
½ cup light brown sugar, packed
¾ cup pumpkin puree (I probably used 1 cup – thought the dough wasn’t pumpkin-y enough)
1 large egg
2 tsp. vanilla extract

For the coating:
½ cup sugar
1 tsp. ground cinnamon
½ tsp. ground ginger
Dash of allspice


Directions:
In a medium bowl, combine the flour, baking powder, salt, cinnamon and nutmeg.  Blend and set aside.  In a large mixing bowl, beat together the butter and sugars on medium-high speed until light and fluffy, about 2-3 minutes.  Blend in the pumpkin puree.  Beat in the egg and vanilla until incorporated.  With the mixer on low speed add in the dry ingredients and mix just until incorporated.  Cover and chill the dough for at least 1 hour.

Preheat the oven to 350˚ F.  Line baking sheets with silicone baking mats or parchment paper.  Combine the sugar and spices for the coating in a bowl and mix to blend.  Scoop the dough (about 2½ tablespoons) and roll into a ball.  Coat the dough ball in the sugar-spice mixture and place on the prepared baking sheet.  Repeat with the remaining dough to fill the sheets, spacing the dough balls 2-3 inches apart.  Dip the bottom of a flat, heavy-bottomed drinking glass in water, then in the sugar-spice mixture, and use the bottom to flatten the dough balls slightly.

Bake the cookies for 10-12 minutes, or until just set and baked through.  Let cool on the baking sheets about 5 minutes, then transfer to a wire rack to cool completely.  Store in an airtight container.


Monday, September 19, 2011

So Long to Summer with Sweet Corn Ravioli


I’ve been delinquent in posting this recipe and with only 3 days officially left of summer I figured I better hurry up!  I actually made this a while ago…twice in fact.  The first time, I was at the beach in NC with friends and corn on the cob wasn’t available so I had to use frozen corn.  It was tasty, but when I changed the ingredients a bit the second time around it was definitely better.  This sounds like such a fancy dish, but believe me, other than it being a little time consuming to make, it’s actually quite simple.  And what couldn’t be good about sweet white summer corn, pasta and a white wine butter sauce?  DELICIOUS!!! (Except to those of you who have an aversion to corn on the cob that I will never understand J)  

I didn’t use a recipe for this.  I just thought about the flavor/texture profile I was going for (creamy, sweet, salty, tastes like corn – obvs) and combined all the ingredients then doled blobs out onto gyoza wrappers – asian dumpling wrappers that are the perfect way to make ravioli quickly – folded them over, sealed them and that was that.  The trick to sealing them so they won’t pop open during cooking is to use a mixture of egg and water and rub a little all the way around the inside edge of the wrappers.  After folding them into half-moons, press the edges with a fork to secure the seal.  Like I said, easy, but time consuming.


Here’s what went into the ravioli:

4 oz goat cheese (I used mascarpone the first time – stick with goat, more flavor)
1 cup ricotta
Sweet White Corn from 4 cobs
Salt, to taste
Garlic powder, to taste
Parmesan, for sprinkling before serving

For the sauce, see my recipe from May 16, 2011 – Fish with White Wine Sauce.  Just add a little less lemon juice, and throw in a couple pinches of dried thyme.

Oh, and for good measure, sprinkle some bacon on top as I did.  Mmmmmm, bacon.


Monday, September 12, 2011

Baking GALS Round 3 - White Trash Anyone?

Before


Odd question, I know.  I’d bet there are plenty of people who would say “yes” to that before even knowing what kind of white trash I’m referring to!  Hmmm…we won’t go there.  J

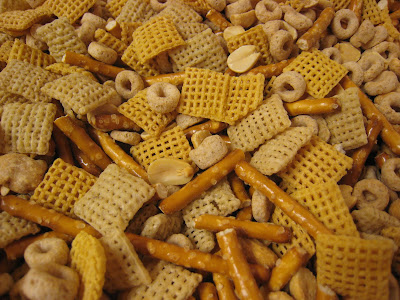
This kind of white trash is much better than the other kind and it’s super easy to make.  Combine a bunch of cereals together with some pretzels and peanuts, melt some white chocolate and mix well.  That’s pretty much it.  When it’s all mixed, turn it out onto waxed paper and let it cool completely.  Only thing to note is that white chocolate doesn’t melt the same way that regular chocolate does.  It becomes stirable, but not pourable.  I had to scrape the melted chocolate from the pan and use my hands (don’t worry, I had my trusty latex gloves on) to gently squish everything together.

So simple and quite delicious….the perfect combination of salty and sweet.  And for those of you who claim not to like white chocolate, try it anyway, trust me.   I hope the fellas like it, it went out in the mail today!

Adapted from recipe by Alton Brown

3 cups rice chex
3 cups corn chex
3 ½ cups cheerios
2 ½ cups roasted salted peanuts
2 cups small pretzels – I used sticks and broke them in half
2 bags (11oz each) white chocolate chips


After - yum!!

**UPDATE**  I have since learned from a very reliable source on the matter, that the trick may be to add a little Crisco oil (meaning vegetable oil I believe) to the white chocolate chips as you're melting them.

Tuesday, August 23, 2011

Meridian Pint - chairs on lockdown?


(Photo from Yelp.com)


I read a lot of DC blogs and over the last year or so I’ve read about Meridian Pint (http://www.meridianpint.com/) several times, but had yet to check it out. Well last Friday I was hanging with some friends enjoying white wine from a plastic jug that my friend had recently brought back from Europe (I was told this is how it’s bottled for shipping, but I’m skeptical :-) though it was pretty tasty), when we decided to wander down to Meridian Pint for some food.

It was a gorgeous night, especially for August in DC – warm, but not sticky – perfect for sitting outside. We were happy to see that there were a few open tables on the patio. When we went in to talk to the host though, he was a little frantic – even with some empty tables inside too. There was nobody waiting to be seated before us. We were three so we asked to pull up a chair to one of the empty two-tops outside. This seemed to fluster him even more and he went into some confusing explanation about how the chairs were all “locked up”. They had “very strict rules” about the patio and couldn’t change anything. We suggested taking a chair from a table for 4 that only had 3 people sitting at it, but instead he went off to ask the manager to unlock a chair for us to add to our table. We stood waiting, looking out at the patio to see from where this mystery locked chair would appear. Wouldn’t you know, he ended up pulling it from another empty two-top at the end of the patio. We all just laughed in confusion and went to our seats.

The beer list is pretty extensive. It happened to be DC Beer Week and the list of specials was on the menu. Friday was all Long Trail beers for $4 – great! We thought. The first thing the waitress said when she came over was that they were out of all Long Trail beers. What?!?! It was only 10:30 – they still had a long night ahead. And aren’t you supposed to stock-up, or even overstock, on whatever your special is? Not looking good for my first MP experience….

At any rate, we proceeded to eat, drink and have a good time brainstorming about a big money making scheme to get us out of our office jobs (let’s just say food trucks will have NOTHING on us!!). So will I go back? Yes, almost every place deserves a second chance. Plus, I didn’t get a chance to see the basement with the table taps – why is it so fun to pour your own beer??

Shortly before we were ready to leave, the host reappeared to seat more people. He went right over to the table of 4 with the extra chair, grabbed it and dragged it over to the two-top he had taken a chair from for us. We shook our heads and laughed….I guess that one wasn’t locked.


Tuesday, August 16, 2011

GRAFFIATO


Prosecco on tap - awesome!!
So who’s heard of Mike Isabella?  How about Zaytinya?  Or Top Chef??  Well, if you aren’t aware, they are all connected.  Mike Isabella used to be the chef at Zaytinya, a great Greek/Mediterranean tapas restaurant in Penn Quarter.  From there he went on to be on Top Chef and Top Chef All-Stars.  After all of that, he decided to open up a restaurant of his own….and that brings us to Graffiato.  Also a tapas place, this is Italian rather than Greek, and it’s really delicious – trust me on that as I feel like I sampled nearly half of what’s on the menu!  Here’s my take on what I tried:


Let’s start with the bread –
Some was sliced raisin bread, some was a simple focaccia and some was sweet, with corn and almost cake-like.  All was good, none was out of this world (hey - my mom can make some pretty kick-ass bread), but it was nice to have a few different kinds.  It came with olive oil jam (sort of solidified olive oil) as well as fresh ricotta.  Again, a nice touch rather than just serving butter.

On to the rest of the food –

Hand Cut Spaghetti – Something so simple, but yet had tons of flavor.

Risotto with Asparagus and Pesto – Why have I never thought to put pesto in risotto before?!?!  This was definitely one of my favorites...

Chicken Thighs with Pepperoni Sauce – He is famous for this pepperoni sauce so I had to try it.  The skin on the chicken was awesome…crispy, salty, yuuummy!  The sauce?  Well I thought there should be more of it for one, and second, it was definitely tasty, but maybe I’d just prefer it with something other than chicken.  Nonetheless, still worth trying.

Sweet Corn Agnolotti – Wow – try it.  ‘Nuf said. (Well, except that it already inspired me to concoct some of my own – post on that later.)

Sugar Snap Peas – The tomato pesto and goat cheese on them were a nice addition, and thankfully not overwhelming.  I love the fresh crunchy sweetness of snap peas and was glad that still came through.

White House Pizza – Really delicious blend of cheeses and a touch of sweetness from the honey.  I’m not usually a huge prosciutto fan (on the other hand, hold me back from Serrano!), but in this case it was the perfect complement to the cheeses.  I’ve had better crust, but I still went back for more than one slice.  J

Nutella Cookies – Salty + Sweet = Yum.  The chef’s wife makes these off site and brings them in every day so nobody will get her recipe.  Smart woman…though replicating them maybe become a personal challenge of mine!

Peach Gelato – this was the one thing we had that I likely wouldn’t repeat – it just lacked flavor.  Häagen-Dazs peach sorbet has this gelato beat by a long shot! 

And finally - I also had some of the "punch of the day" - a concoction with gin, citrus and a fresno pepper...really interesting flavor.

All in all, go try it.  There are still at least a few more things I want to try.  I know some people are getting “tired of the tapas thing”, but sometimes I prefer it.  I can be really indecisive and/or overwhelmed when so much on the menu sounds good – tapas allows you to taste it all.  Nice job Chef Isabella – I’ll definitely be back!!

I'm with the Chef!!

Baking GALS Round 2 - Caramel Popcorn


I’ve been having baker’s block recently.  Anytime I think of something to make, it’s always something I’ve already done…booorrrrinng!  I wanted to try and come up with something new and exciting for this round of Operation Baking GALS.  Well???  Epic fail.  I went right back to a recipe I use every Christmas….caramel popcorn. Believe me though, you’d totally understand if you’d had it before.  This past year it was renamed “crack-corn” because it is just so addictive.

I figured the guys are probably getting tons of chocolate chip cookies or snickerdoodles or all of the basics, so while not a new recipe for me, the popcorn is probably going to spice things up a bit for them.  Plus, there’s something to be said for the tried and true, isn’t there?  Trust me, it’s amazing!


My Amish Friend’s Caramel Corn (from allrecipes.com)
7 quarts plain popped popcorn – no skimping with microwaved here people - stovetop all the way!
2 cups dry roasted peanuts (optional)
2 cups packed brown sugar – I use 1 cup light/1 cup dark
½ cup light corn syrup
1 tsp salt
1 cup margarine – I use unsalted butter
1 tsp vanilla extract
½ tsp baking soda

1)      Place popped corn into two greased baking pans (about 9x13x2).  Add peanuts if using.  Set aside.

Preheat oven to 250º.  Combine brown sugar, corn syrup, butter and salt in a saucepan and bring to a boil over medium heat, stirring enough to blend.  Once it begins to boil, boil for 5 minutes stirring constantly.

Remove from heat and stir in the vanilla and baking soda.  The mixture will turn light and foamy.  Keep stirring and immediately pour over the popcorn in both pans.  Stir to coat.  Don’t worry about getting absolutely everything coated at this point.

Bake for 1 hour, removing the pans and stirring well, every 15 minutes.  Line the counter with wax paper.  After an hour, dump the popcorn onto the waxed paper and separate the pieces – work fast as it cools pretty quickly.  Allow to cool completely then store in air-tight containers or resealable bags.
Saturday, July 30, 2011

Nutella time.


This morning I took on a little experiment.  I wanted to see if I could make my own “chocolate chips” from nutella, so I broke out the piping bag and got to work….here they are!


I was making nutella scones.  I know, I know – more scones?!?!  I promise, this is the last variation for a while….next time its back to regular recipes, and perhaps a restaurant review later this week (there’s a new place I’m checking out soon).

These were inspired by some friends of mine.  A local coffee shop sells them and apparently runs out frequently, so I thought I would make my friends their own batch.  The only issue was how to deal with the nutella.  Do you just mix it in the batter?  Do you put down a layer of batter, then a blob of nutella then more batter so it’s layered?  I wasn’t sure what to do….until I had what I thought was a moment of brilliance – freeze it!  If I could make my own chips then I could just stir them into the batter as you normally would.  It all seemed to be working well.  They froze into chips and I tossed them with the dry ingredients.  It was when I added the wet ingredients that my brilliant plan fell apart.  The chips instantly started melting, so what choice did I have but to just stir it all together.  I made sure not to overmix it as I thought it would be better to have streaks of nutella rather than it all being completely blended.

It ended up working out just fine.  The scones were as fluffy as always and the nutella flavor really came through.  Of course I made some icing for these too – just a quick glaze of powdered sugar, cocoa powder and some milk, and look – they look great and are quite delicious!  Perhaps I’ll start peddling my goods outside the coffee shop….my baked goods that is.­­­­  J


Adapted from Strawberry Scone recipe on Annie's Eats

Ingredients:

1 large egg
¼ cup vanilla yogurt
½ cup milk
2¼ cups all-purpose flour
¼ cup sugar
1 tbsp. baking powder
½ tsp. salt
8 tbsp. cold unsalted butter, cut into small pieces


Directions:
In a small bowl, whisk together the egg, yogurt and milk until blended; set aside.  In a large mixing bowl combine the flour, sugar, baking powder and salt.  Stir to blend.  Add the butter pieces to the bowl with the dry ingredients and cut the butter into the flour using a pastry blender, until the largest butter pieces are the size of small peas.
Add the nutella chips to the flour mixture and toss to coat.  Add the wet ingredients to the bowl with the dry ingredients and gently fold together with a spatula until a sticky dough has formed and all ingredients are incorporated.  If necessary, add more milk 1 tablespoon at a time to hydrate the remaining dry ingredients.
Transfer the dough to a well floured work surface and pat into a disc about 7-8 inches in diameter.  Slice the disc into 8 wedges.  Or use your super convenient mini scone pan as I do and dole out the batter into 16 scones.
To bake, preheat the oven to 425˚ F.  Line a baking sheet with parchment paper.  Place the shaped scones on the prepared baking sheet and bake until lightly browned on top, about 15 minutes.  If using the mini scone pan, bake for about 10-12 minutes.  Let cool a few minutes before serving.  If adding glaze, wait until completely cooled before doing so.  Enjoy!!

Sunday, July 17, 2011

Lemon Blueberry Scones


Pre-Glaze

I hope at least some of you made it out to the bake sale this morning – it was a gorgeous day for it, and thankfully my scones came out really well!  I thought nothing could beat the cinnamon ones, but wow – these lemon blueberry give them a tough run for first place.  They tasted so fresh and summery, perfect for a warm sunny day.

I got the recipe from another food blog I read regularly, Annie’s Eats- http://annies-eats.com/.  It was actually for strawberry scones which also sound amazing, but I was worried they’d get soggy sitting out in the sun.  I followed her recipe and just swapped out blueberries for the strawberries.  I also added a lemon glaze, because really, what isn’t better with a sugary glaze?!

Now, time to start thinking about what I’ll enter in the baking contest this year…I need something new and creative.  Ideas??

Post-Glaze

Packed and ready for the sale!

Wednesday, July 13, 2011

Scones for Sale!


I must be feeling super generous this month.  I got an email the other day about the DC State Fair (remember that cupcake contest I entered and, well...lost, last year??).  The organizers are holding a bake sale to raise funds.  The Fair isn't for another couple months, but they are starting to prep for it already!  They asked for people to donate baked goods to sell this coming Sunday and of course I volunteered.  I'll be making a couple batches of scones...a new flavor this time - duhn, duhn, duhhhhhhhn - to be revealed in a few days along with pictures and recipe!

In the meantime, mark your calendar for Sunday and make sure to buy at least one of my goodies - you won't be disappointed, I promise (That's What She Said)!!


Wednesday, July 6, 2011

Road Cookies Really Hit The Road.....


I haven’t been baking as much as I used to and I miss it!  It’s difficult to get an office full of ladies to eat a ton of baked goods on a regular basis and I certainly can’t have everything hanging around my place.  But, I wanted to get back to it, it’s a release for me – and honestly, once you’ve had a taste of my baking, oh yeah….it’s on!  J

I saw on Facebook that one of my friends was part of something called Operation Baking GALS, a community organization that sends baked goods to troops overseas.  Perfect!  I get to bake up a storm and ship them off so I’m not sitting on the couch eating them myself, while doing something good for someone else….I signed up right away.

There aren’t really any rules about what you can or can’t bake, which is great, it will allow me some creativity, but for the first round, I wanted to make something that would rope people in and have them remember my name….hence, the road cookies (see post from Sept. 2010).  Get ready fellas, you’re not going to know what hit you when you get these!

Here goes the first package, off to Afghanistan......


Monday, June 13, 2011

Curry Chicken Pasta Salad


While it’s still unofficially summer, it is officially Wolf Trap season.  For those of you not familiar, Wolf Trap Farm Park in Virginia is, in my opinion, one of the absolute best outdoor venues for live music.  This is due in part to the fact that you are allowed to bring in your own food and alcohol.  I try to make sure I get to at least one show per summer – going there is what makes it truly feel like summer to me.  Sitting out under the stars, chowing down on too much food, and possibly even making nice with your picnicking neighbors and getting to try their homemade frozen whiskey sours – yum!

I recently went to Wolf Trap to see the Indigo Girls perform.  I know, I know, lesbian rock isn’t everyone’s thing, but let me tell ya, the people watching at their shows is amazing!  And you can usually overhear some pretty funny conversations – not to mention see more women with short spiky haircuts in one place than you could ever imagine.  Ahhh, good times.  But really, if you think you don’t like their music, give them another try and start with these songs….the super political “Shame on You” (because come on, this is the DC area), the make-you-want-to-roll-the-windows-down-and-go-on-a-road-trip “Get Out The Map” and the heart-wrenching “Power of Two” – wow.

Now on to the food.  A picnic generally calls for some sort of pasta salad, but I personally can’t stand the “macaroni salad” you find in pretty much every grocery store – ugh, way too sweet and often too soupy with mayo.  Several years ago my mom came across this recipe and I’ve been making it ever since.  I have no clue where she found it so unfortunately I can’t give credit where credit is due…sorry!

This pasta changes things up a bit.  It combines sweet and savory, adding fruit where you may not expect it and it works amazingly well.  Even if you’re not a fan of curry, try it – you can add as little or as much as you want.  The flavor combination is really delicious.

Ingredients

1 lb tri-color spiral rotini (I used whole wheat shells this time and I think I’m sticking with that)
1 lb boneless skinless chicken breasts cut in bite-sized pieces
1 cup red seedless grapes cut in half
1.5 cups cantaloupe cut in bite-size chunks (this was in the original recipe but I usually omit)
¾ - 1 cup celery thinly sliced   
1 cup mayo (More or less, depending on your preference.  I use Hellman’s Light)
Curry powder - to taste
S&P - to taste

Instructions

1) Boil pasta according to package directions.  Drain, rinse and set aside.
2) Sauté chicken with a little olive oil, S&P, a couple shakes of curry powder and I use McCormick Montreal Chicken seasoning, of course.
3) While chicken is cooking, slice grapes, celery and cantaloupe and set aside.
4) Also while chicken is cooking, put mayo in a small mixing bowl, add curry powder, stir and taste until you reach your desired flavor.
5) Combine all ingredients in large bowl and stir to coat everything in the mayo.  Chill and serve.
Tuesday, June 7, 2011

Homemade Falafel and Yogurt Sauce


Today was a blah day at work.  All day I kept thinking, how is it only Tuesday??  I think two weeks in a row of 4-day work weeks completely spoiled me.  But I was determined not to let the entire day be a bust.  So what does someone like me do for a pick-me-up?  Well, other than pouring a nice cold glass of wine immediately upon getting home, I cook.  Days like today are when I like to get creative in the kitchen.  I may refer to a recipe or two for inspiration, but when it comes down to it, I just wing it.  Sometimes I get lucky, sometimes it ends up in the trash and I have a bowl of popcorn for dinner!  Thankfully today I got lucky….

I’ve always wanted to make falafel, but the thought of deep frying something has never really appealed to me.  I try to be as health conscious as possible - and by the way, it’s bathing suit season people!!  When I get a craving though, I have to satisfy it.  So I decided I’d make falafel patties and fry them in a pan like burgers rather than immersing them.  I used a mixture of canola and olive oils, just a few tablespoons of each, just barely coating the bottom of the pan.  I would have preferred to use all olive oil, but the smoke point is higher for canola oil and these patties needed a good sear.

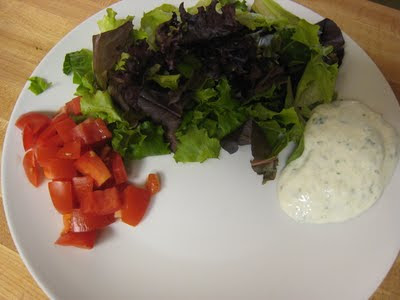
Now – if you know me, you know I am slightly moderately totally obsessed with yogurt!  And every good falafel has a delicious yogurt sauce accompanying it, right?  Done.  I mixed up a quick sauce of Greek yogurt, chopped parsley, grated cucumber, garlic, salt and pepper.  Just taste it as you go and season accordingly.  If you don’t want to take the time to make this, you could always use some hummus or tahini instead.

I opted to skip the pita or wrap today (again, images of myself on the beach flashing before my eyes…) and just have the falafel with some mixed greens and a deliciously ripe Roma tomato.

Anxiously awaiting the star of the show....

It wasn’t the “best falafel in the world” that I had in Paris last year (seriously, this place had a bouncer for the line and everything!), but a couple bites of this meal, a few sips of the wine, the fact that I got to be creative and use one of my favorite appliances – my food processor – and today was looking up!


 To make the falafel, combine the following:

1 15-16oz can chick peas
¼ cup fresh chopped parsley
2 cloves garlic
½ medium red onion, large dice
½ tsp ground coriander
1 tsp ground cumin
– ¼ tsp ground cayenne pepper (optional)
2 Tbsp flour

Amounts are estimates; I really did just throw everything in the processor and puree it.  You are looking for the consistency of a thick paste.  If it’s too thick, add a drizzle of olive oil.  If it looks too loose, add a little more flour.

Form the paste into patties about the size of your palm and about ¼ - ½ inch thick.  If you make them any bigger they may fall apart as you cook them.  On medium heat, fry them in oil until dark golden brown, then flip and repeat.  Drain on paper towel when done and enjoy while hot.

Dinner is served!