Saturday, September 5, 2015

Quiche on a whim...


It was 2pm and I hadn’t yet eaten.  I was hungry but really wanted something satisfying, not just something quick.  I had just been to the grocery store and was trying to stuff my freezer with the meat and frozen fruits and veggies I’d just purchased when I saw the pie crust….  I sometimes like to keep one in the freezer in case of “emergency".  Well this one had been in there for a while so it was time to put it to use.

I love eggs and was considering a quick egg sandwich anyway, so this was a perfect, much tastier alternative.  I didn’t have a recipe – I just started throwing in some cheeses and veggies I had in the fridge/freezer.  Of course I needed a little bacon too, so I chopped up a few slices and cooked those until crisp.  Here’s what I ended up with:

4 whole eggs
4 egg whites
½ cup milk
¾ - 1 cup cheese of your choice – I used a mix of grated asiago, grated parmesan, and a couple slices of pepper jack that I tore into pieces
½ red bell pepper, diced, sautéed
3 scallions, thinly sliced – white and green parts, lightly sautéed
½ cup frozen chopped kale, thawed and drained
¼ - ½ cup frozen corn kernels
3 strips bacon – chopped and cooked until crisped, drained on paper towel
Pinch of garlic powder
Salt & Pepper to taste


A few notes –
  • When adding onions and /or veggies, be sure to sauté them for a few minutes first to get some of the water out – you don’t want a soupy quiche!  Plus, that sauté will add some good caramelized flavor.  Let them cool a little before stirring them into the eggs.
  • Beat the eggs slightly with a fork then add the milk and beat again.  Slowly add and stir all additional ingredients together and pour into unbaked pie crust.
  • I baked this at 375 degrees on a preheated cookie sheet for 30 minutes, and then let it rest out of the oven, still on the cookie sheet, for 10 minutes before serving.  It was perfectly tender and held together nicely.
  • Don’t be afraid to just go with the flow in the kitchen.  That’s the beauty of cooking, it’s often an experiment – and if you think ingredients sound good together, then they probably are.  

Tuesday, May 26, 2015

Farro Salad with Lemon Vinaigrette


It's been a month and I'm still being inspired by Turkey.  The food was just so fresh and flavorful - perfect timing as we barrel into summer.  A friend of mine has a great rooftop in Logan Circle so we took advantage of the amazing Memorial Day weekend weather and grilled out.  This farro salad was one of our sides.  I had a very similar salad at Kafe Ara in Istanbul and I haven't stopped thinking about it.  Farro isn't a grain you see all that much in the US.  We have it, sure, but it's more often seen in Italy and other parts of Europe and the Middle East.  I'm not sure why, it's flavorful and slightly chewy like barley...so good and hearty, and it cooks way faster than barley or rice - I'm sold.

The add-ins below are just one (really delicious) option - you can add any veggies you like with any dressing you like.  You can add chunks of chicken to make this a meal, or serve it as a side to a fish filet.  Use wild rice instead of farro...you get the point, its completely customizable.  This version is sweet, tart, salty, crunchy, chewy - all of the varying textures and flavors make it super satisfying.  I hope you give it a try! 


 Ingredients

2 cups uncooked Farro
1/2 cup Slivered Almonds, toasted
1/4 cup Dried Tart Cherries, roughly chopped (or whole, your preference)
1/4 cup Pomegranate Seeds
1- 1.5 cups Cucumber, diced
1/4 cup Sprouts, rinsed with roots trimmed off (optional, I use alfalfa)
2-3 Scallions, chopped
2 Tbsp Fresh Parsley, chopped
1 Tbsp Fresh Mint, chopped
1/3 cup Feta cheese, crumbled
Lemon Vinaigrette*

Instructions

Cook farro according to package instructions, then drain and set aside to cool in a large mixing bowl.  I add a couple shakes of Montreal Chicken seasoning, as well as one chicken bouillon cube, just for added flavor.  You can always use chicken stock/vegetable stock/plain water – whatever you choose.

Toast the almonds in a dry small frying pan on medium-low heat, just until they start to brown and you can smell them – should only take a few minutes.  Set aside to cool.

Chop and prepare all other ingredients.


When the farro is cool, add remaining ingredients.  Drizzle with the vinaigrette and toss well to coat the entire salad.  Add additional vinaigrette to taste.  Feta can be tossed in with everything else, or just crumbled on top.  Serve at room temperature, or chilled if you prefer.

*I make my own vinaigrette.  I don’t measure anything (sorry!!), but here is what I include:

Fresh Lemon Juice, a few tablespoons
Dijon Mustard, a tablespoon or so
Salt & Pepper, to taste (slightly more pepper than salt)
Dried Thyme, couple shakes of the bottle
Honey or Agave Nectar, maybe a tablespoon (or use a pinch or two of sugar)
Extra Virgin Olive Oil – good quality – probably ¼ - ½ cup

Whisk everything together until well combined.  Can be stored in a jar or bottle in the fridge for a couple weeks.

Wednesday, April 29, 2015

Orange Ricotta Cake - A Taste of Turkey


On my trip to Turkey a few weeks ago, I stayed one night in an adorable old stone hotel, called the Taş Otel in the town of Alaçati (Ah-la-cha-tuh).  Every afternoon they serve their guests homemade cakes and çay (black tea).  When I went into my room, there was a cookbook laid out on the bed.  What?!  To an avid baker, this was basically the best gift ever.  Who needs mini soaps or lotions or a mint on their pillow?  Give me the cake. 

So, last weekend I was up in Cape Cod visiting my parents, relaying the details of my trip to them – seemed like the perfect time to test out one of these recipes.  My mom is also a baker and my parents love sweets.  My mom picked this recipe for us (and wrote down another to try later herself).  This cake was super easy to whip up.  My dad is allergic to nuts so we left them out, and frankly, I think the texture of the cake was a bit too soft to handle them.   


I made this in a loaf pan thinking it would have the texture of banana or zucchini bread, but it’s actually much lighter and fluffier than that.  The loaf pan was okay, but I think next time I’d use a 9" round or 9x9" square pan and eat this with a fork.  Loaf pan/round pan/nuts/no nuts – do what you prefer, but definitely give this a try.  The orange flavor comes through nicely but isn’t overpowering, and the ricotta provides that perfectly satisfying crumby texture.  No icing necessary.

And of course - when in Turkey, stay at the Taş!  Alacati Tas Otel


Ingredients

125g unsalted butter, softened
225g sugar
3 eggs
450g AP flour
2 tsp baking powder
2 tsp vanilla
Grated zest of 2 oranges (I used 1)
2 spoonfuls orange marmalade (I used 2 rounded Tbsp)
100ml orange juice
100g chopped walnuts (I omitted)
125g ricotta (I used lowfat)

Instructions
  1. Preheat oven to 350 degrees.
  2. Mix butter, sugar and eggs until well blended.
  3. Add flour, baking powder and vanilla.  Mix.
  4. Add orange zest, marmalade and juice.  Mix.
  5. Add ricotta and stir to combine.
  6. If using walnuts, mix half into the batter and sprinkle half on top prior to baking.
  7. Bake for 30-40 minutes in a greased pan.
  8. Cool in pan on a wire rack.
Wednesday, April 15, 2015

Merrrrhaaabaaa Turkey!


Ok first let’s set the mood…listen to this while you read this post:  Zaynah - Kate Linn

This song was on the radio in almost every cab I took in Istanbul.  In fact, I “Shazamed” it during one of my rides because it was so familiar by that point I had to know what it was.  I kinda love it.  Anyway, let’s get to the trip…

Basically, I spent two weeks eating my way through Istanbul (and parts of southwest Turkey) with some friends, and I loved every minute.  We got a ton of sightseeing in too.  It was rare if we made it home before midnight.  We’d leave the house before noon and tool around all day, generally starting with a big traditional breakfast, tea and coffee, and then ending the day with wine and mezze.

A proper Turkish coffee, complete with some Turkish Delight
Items of note:

1) Turks absolutely love yogurt, eggplant, meat (beef and lamb) and bread.  Lots of other things too obviously, but those three things play a prominent role in their diet.

2) You start your day with tea (çay – pronounced chai), have breakfast, then move on to coffee afterwards.  If you start with coffee, chances are, you aren’t Turkish.

3) It’s perfectly acceptable to have at least 5-10 glasses of çay per day.

4) Simit is sold everywhere for about $0.37 each (1 Turkish Lira).  The easiest way to describe it is a large, skinny, sesame bagel that’s a little dry.  It is truly a staple.  I found it much tastier when slathered with jam, honey or olive tapenade.

5) In addition to simit, another favorite treat is kaymak - clotted cream made from water buffalo milk.  Yes, seriously.  Our food tour guide referred to this as "The Queen" of Turkish breakfast.  Generally, a large glob of it is placed on a plate and surrounded by honey.  You take a smear of the cream and honey, smear it on your simit then groan in delight.  Typically it is eaten maybe once a week or so - its not an everyday thing by any means, but I'll tell ya - every place I had breakfast had kaymak!  Here's an article about it: Kaymak

6) Baklava does not have honey in it!  Who knew?  I think here in the States, it usually does, but traditionally it gets its sticky sweetness from simple syrup (sugar dissolved into water).

7) You will be hard pressed to find other types of food in Istanbul.  Turks love Turkish food – why would they eat anything else?!  I’m down…
-          
In addition to eating out for every meal for two weeks, a friend and I did a culinary walking tour around the Beyoğlu neighborhood, including parts of Cihangir and Taksim.  It was really interesting and fun to check out some little mom & pop places tucked into the neighborhoods.  I highly recommend doing one if you have the time.  Here is the site we used:  Culinary Tour

Ok - I’ll let the pictures tell the rest of the story.  The moral is, Turkish food is fresh, full of flavor, and relatively healthy compared to other cuisines.  

         
Olives and Cheeses
         
Even homegrown olives!

Never short on bread, and not a packaged loaf in sight.
Look at the color of those yolks!  
Fresh squeezed, of course.
Amazing bakeries for both sweet and savory items.
Iskender - bread cubes covered with meat, butter sauce and yogurt.

And from our walking tour...

Olives, olives and more olives.
Name a vegetable - they pickle it!
Stuffed Mussels - with rice, raisins, pine nuts and cinnamon
A row of Meyhanes - restaurants serving Raki!
Aaand, that's a sheep's head!
Not a bit will be wasted.
Finished product - all seasoned up - brain, cheek, eye muscle and tongue.
And there I am, trying out the cheek - not bad!!  I stopped there...

Now get to Turkey and dig in!


(Turkish Breakfast pics at top courtesy of Christina McDowell)
Thursday, February 26, 2015

Whole Wheat English Muffins


Ok so maybe shape-wise these don’t look so great, but hey, everyone has to start somewhere.  Before these, I didn’t even think homemade English muffins were an option.  Not really sure why, I have made tons of other bread products over the years, but when Thomas’ makes them as tasty as they do, why mess with it?  But you know me, I’ve gotta see for myself…


Well, other than a little time for this dough to rest, these were SO easy.  Like for real.  Mix up the dough, let it sit for an hour or two.  Scoop them into a pan to brown for a few minutes on each side, then transfer them to a baking sheet and bake for 8-10 more minutes.  Before you know it you have some really delicious muffins.  And I know exactly what ingredients I put in them – nothing fake or preserved about them.  Now that’s my kind of nooks and crannies.

The dinner version - topped with pesto and mozzarella.
And for breakfast - toasted with peanut butter.

Here are the ingredients and a link to play-by-play instructions:

2 ¼ tsp instant (rapid rise) yeast
⅓ cup warm water (between 100º-110ºF)
¾ cup buttermilk, room temperature
½ cup low-fat Greek yogurt, room temperature (I used nonfat)
2 Tbsp unsalted butter, melted
1 ½ tsp honey (Optional)
1 tsp kosher salt
2 cups white whole wheat flour (King Arthur Flour, of course!)
½ tsp baking soda
Yellow cornmeal, for sprinkling on the baking sheet


Monday, February 9, 2015

Crockpot Roast Chicken


I’ve been craving a good home-cooked, home-style meal.  These gray days just make me want to turn on Netflix, get under a blanket and eat something warm and comforting.  Enter the Crockpot – a little work with a bigger return.  This time, I put an entire chicken in it and wow, it was literally falling off the bone when it was done.  Now this isn’t your beautiful, golden, crispy skinned chicken – this one is all about tenderness and flavor, and it delivers on both.

While a big pile of mashed potatoes would have been amazing with this, I opted for a slightly healthier, lower-carb option – mashed cauliflower.  I cut up an entire head and steamed it.  Admittedly, I did include one Yukon Gold potato, just to help with the texture – I mean come on, try as I might, that cauliflower is not going to turn out like potatoes do.  At any rate, when it was all tender, I followed the same process that you do with potatoes – a little butter, a splash of milk, some salt & pepper, and in this case some garlic powder….quite tasty if I do say so myself!  Tasty enough to fool my stomach (this time at least).  It’s definitely worth a try, if you haven’t already done it.

But back to the chicken.  It’s pretty simple – you cook up some onions, garlic and tomato paste, add a few other flavor components, then pour it all into the Crockpot.  Place the chicken on top and let it go.  The recipe calls for cooking it for 4-6 hours.  I went with 5, and I think I easily could have cut off at least 30 minutes, but it will depend on the size of your chicken as well as your Crockpot.   Get ready to enjoy the amazing aroma that will soon fill your house.

Here’s the recipe:


By the way, this says to skim the fat from the cooking juices, then strain it and serve with the chicken.  I went ahead and cooked it down with a little flour to make it more of a gravy than juice.  I highly recommend that method.

And if what you’re looking for is that crispy-skinned version, look no further than this one – Oh. My. Yum:    The Bitten Word


Monday, February 2, 2015

Tortilla Time


Quesadillas, tacos, enchiladas, sandwich wraps, fresh chips, soup toppers – so many uses for tortillas.  You can even sprinkle them with some cinnamon and sugar and bake them into a crispy treat.  But have you ever looked at the ingredient listing on those store-bought tortillas?  Even the 100% whole wheat ones, which are presumably better for you?  Well, I saw a few recipes for homemade tortillas online, and knowing I had some in my fridge already, I came home and checked the info on the back….sure enough, about 15 ingredients, more than half of which I was clueless about.  These have 5.  That’s it –the store-bought ones went into the trash immediately.

One afternoon when I had some free time, I decided to give them a go.  The recipe said they took about 45 minutes start to finish, but come on…that couldn’t be right.  I’m glad to say it was.  Just a few ingredients tossed together and kneaded a few times, divided and rolled out into rounds, then fried in a dry pan for about 30 seconds on each side and donezo!  Seriously - that simple.  This recipe makes a dozen.  If you like them a little thicker, you can always cut it down to 9 or 10, or if you’re going for tacos, make them smaller and get up to 15-16….another bonus to making your own. 

Anyway, here’s the process and what I did with mine.  It included some making some fun cuudles (my word…think zucchini noodles (zoodles), but with cucumber!) with my new kitchen gadget, and obviously talking like Ned Flanders while cranking them out… cuudly doodly!  Don’t be jealous.  ;)

Roll out to about 9"
Fry in a dry pan
Cuudles!  Just ignore that weird flaccid cucumber core....
Ingredients

3 cups All-Purpose or White Whole Wheat Flour
1 tsp baking powder
1 tsp salt
1/3 cup refined coconut oil, melted (or canola/olive oil)
1 cup warm water

Instructions
  1. Melt the coconut oil in a small pan and set aside.
  2. Add the dry ingredients in a medium bowl and mix completely. 
  3. Pour the water and melted oil over the flour mixture and stir gently until everything comes together in a ball.
  4. Knead the dough for about 30 seconds – 1 minute, then divide into even pieces.
  5. Roll each piece into a ball and cover to let rest for 10 minutes.
  6. After resting, roll each ball out to your desired thickness (these will only puff ever so slightly when you cook them).
  7. Cook each tortilla in a dry pan over medium-high heat for about 30-45 seconds on each side, just until some light brown bubbles start to form.
  8. Set aside on a plate, and stack them as each finishes cooking to keep them warm.
  9. Use immediately, or wrap them individually and store in the fridge for a few days, or the freezer for a few weeks.
Turkey Roll-Ups - I seasoned some cream cheese to use as the spread - yum!

Note – I have an alternative recipe that adds some chopped spinach to the flour mixture.  That version is mixed in the food processor for even distribution.  I’ll be trying those soon!

Recipe adapted from: Homemade Tortillas

Sunday, January 18, 2015

Chili. Chicken Chili.


It got cold here in DC, and that means its chili season.  In fact, I can’t believe I haven’t already made it this winter.  Beef stew made it into the line up once, but no chili…  I decided to follow the masses and make a chicken chili, which seems to be the cool thing to do these days.  I think I’ll always be partial to the ground beef variety that I grew up with, but if I’m going to stray from that, this is a good direction to go!

I first had this chili at a chili-tasting, of sorts, that my office held a while back.  Three people hauled in their crock-pots, each with a different kind.  I loved this from first bite.  I did make a couple changes to the recipe, but only slight ones, and it was mostly due to my grocery store not having the proper ingredients.  Here’s how it’s done:

Recipe adapted from: Chicken Chili

Ingredients

3 boneless skinless chicken breasts (or store-bought rotisserie chicken)
1 14.5oz can white beans, partially mashed
1 Tbsp canola or olive oil
1 medium jalapeno pepper, minced (I used 1 red jalapeno and 1 serrano chili)
2 medium poblano peppers, diced
1 large yellow onion, diced
4 cloves garlic, minced
Kosher salt & Pepper
1 Tbsp ground cumin
1 ½ tsp ground coriander
1 tsp ancho chili powder (I used ¼ tsp chipotle chili powder and ¾ tsp regular chili powder)
1 14.5 oz can petite diced tomatoes (my addition - chili isn't chili without some tomatoes)
4 cups low-sodium chicken broth
2 limes, juiced (plus additional wedges for serving)
¼ cup cilantro leaves, chopped

Instructions
  1. Trim the chicken breast of any excess fat and poach them in chicken broth (and a couple shakes of McCormick Montreal Chicken Seasoning if you have it) until just cooked through.
  2. Drain the cooking liquid and let the chicken cool.  When cooled, shred the chicken with 2 forks.
  3. While the chicken is cooking, chop the onions, peppers and garlic and sauté until slightly soft.
  4. Add spices, stir to mix evenly and cook another minute or two longer.  Add canned tomatoes at this time, if using.
  5. Add chicken broth and lime juice and let simmer for about 15-20 minutes.
  6. Add beans and continue to let simmer for another 10 minutes or so.
  7. Add the shredded chicken and chopped cilantro and stir to combine.
  8. Let simmer about 5 minutes longer.  Serve and enjoy!
  9. Optional toppings:  sour cream, tortilla chips, shredded cheese, lime wedges, additional cilantro


Monday, December 15, 2014

Joe Biden's Nuts. Pecans, that is....


Bet that got your attention.  Get your minds out of the gutter, people!  I’m talking about spiced pecans, and they really are from Joe Biden.  Well, more likely Dr./Mrs./Jill, but nevertheless, this recipe was submitted by the VP and his wife to Food Network Magazine a few years ago.  I’ve tried a couple different variations of these in the past, but was in search of something new this year.  And if you know me at all, you know I love Joe B., so I was happy to give these a Go.

This recipe comes together very easily.  The baking takes a while, but after having tried stove-top versions, I think the flavor is better when you bake them.  The flavor of the nuts deepens as they roast, and that’s definitely a good thing.

I did tweak the spices a little.  I cut back on the cumin a tiny bit, increased the cinnamon slightly, added a little brown sugar with the white, and threw in a few shakes of nutmeg as well.  There is plenty of cayenne in here, so even with my sweet additions, these still have a kick!  They are a great holiday party snack or addition to your cheese platter.  I’ll warn you that if you can handle the heat, they are quite addictive, so go ahead and double that batch.  Way to go, Joe (and Jill)!

You can find the recipe here: 


Note - you can substitute any kind of nut you want here.  I've tried similar recipes with walnuts and those are also delicious. 

Sunday, November 16, 2014

Beer Cheese Bread


I have been flagging and saving beer cheese bread recipes for years now, but have shockingly never made any.  Well when I saw this one (in a King Arthur Flour catalog, where else?), and noticed that there were only 4 ingredients, I ripped it out and made it three days later….about time!

As I usually do the first time, I followed the recipe exactly.  As such, the bread is good.  But I can definitely make this better.  First of all, I think ½” chunks of cheese are way too big.  I’m going with ¼” next time for more even distribution.  Also, this could use a little kick – I’m thinking some chopped pickled jalapeno.  I ate this at room temperature the first time and it was good, but I highly recommend toasting it.  The edges get a little crispy and the cheese gets nice and soft – mmm, mmm.  Bread and cheese?  That always hits the spot.

Ingredients

4 cups Self-Rising Flour (I always add an extra pinch of baking powder)
¾ cup Vermont Cheese Powder
8 oz sharp cheddar cheese (I used extra sharp, but it was a little harsh – I’ll use medium next time.  Asiago or Gruyere could be good too.)
2 cups beer – nothing too intense, perhaps a lager

½ cup additional cheddar cheese, shredded, for the topping.


Instructions

Preheat oven to 375º.  Lightly grease a 9” to 10” round deep, lidded Dutch oven or bread crock.

In a large bowl, stir together the flour, cheese powder, and cubed cheese.  Add the beer, stirring until no dry spots of flour remain.

Pour the batter into the Dutch oven or crock and smooth the surface.  Sprinkle with the shredded cheese, cover and bake for about 40 minutes, or until golden brown on top and a digital thermometer inserted in the middle reads at least 190º.

Remove from oven and let rest for 10 minutes.  Turn out onto rack.  Serve warm or at room temperature (or sliced and toasted in the oven!).


Wednesday, September 3, 2014

Chocolate Chip Cookies - Finally.


How is it possible?  In 4 years of writing this blog I have never posted a recipe for a plain old chocolate chip cookie - ever.  They’ve always had peanut butter or pretzels or oatmeal or something else taking away from that tried and true pure Chocolate. Chip. Cookie.

Obviously that had to change, and stat.  And I decided to go big…Baking GALS Round 33 gets these Thick and Chewy Chocolate Chip Cookies.  And lucky them.  Forget those old school Nestle Tollhouse, or god forbid…Chips Ahoy (yikes!).   This should forever be your go-to recipe.  These particular cookies are huge,  I mean seriously honkin’ but you can always make them whatever size you like.  From the brown sugar to the extra yolk and the melted butter, these are some of the richest, most flavorful I’ve ever had.  The recipe calls for semi-sweet chips.  I felt like a big cookie called for a bigger piece of chocolate, so I went with chunks and I think it worked well.  Let’s get down to business so you can go hit the kitchen…like now.

Don't worry - I ate this one.
INGREDIENTS:
2 cups, plus 2 tablespoons All-Purpose flour
½ tsp. baking soda
½ tsp. salt
12 Tbsp. (1 1/2 sticks) unsalted butter, melted and cooled until warm
1 cup packed light or dark brown sugar (I used ½ of each)
½ cup granulated sugar
1 large egg, plus 1 egg yolk
2 tsp. vanilla extract
1-1 ½ cups semisweet chocolate chips
DIRECTIONS:
1. Adjust the oven racks to the upper- and lower-middle positions and heat the oven to 325º.  Line 2 large baking sheets with parchment paper or spray them with nonstick cooking spray.

2. Whisk the flour, baking soda, and salt together in a medium bowl; set aside.

3. Either by hand or with an electric mixer, mix the butter and sugars until thoroughly blended.  Beat in the egg, yolk, and vanilla until combined.  Add the dry ingredients and beat at low speed just until combined.  Stir in the chips to taste.

4. Roll a scant ¼ cup of the dough into a ball.  Hold the dough ball with the fingertips of both hands and pull into 2 equal halves.  Rotate the halves 90 degrees and, with jagged surfaces facing up, join the halves together at their base, again forming a single ball, being careful not to smooth the dough's uneven surface. (I skipped that part and used a ¼ cup cookie scoop)  Place the formed dough balls on the prepared baking sheets, jagged surface up, spacing them 2 ½ inches apart.

5. Bake until the cookies are light golden brown and the outer edges start to harden yet the centers are still soft and puffy, 15 to 18 minutes, rotating the baking sheets front to back and top to bottom halfway through the baking time.  Cool the cookies on the sheets for about 10 min.  Remove the cooled cookies from the baking sheets with a wide metal spatula.

Recipe adapted from Baking Illustrated

Friday, July 11, 2014

Strawberry Rhubarb Crisp Bars - Baking GALS Round 32


Bebopareebop Rhubarb Pie.  Ever heard of it?  How about “Mama’s little baby loves rhubarb, rhubarb…”  Still no?  Ha – well, it’s not surprising.  This little ditty is from Garrison Keillor’s A Prairie Home Companion – a show on NPR my parents would religiously listen to on Saturday evenings.  I don’t remember when I heard it, but it was definitely more than a decade ago (yikes!)…and I think it was only the second time I had ever heard of rhubarb.  The first was on a family vacation in Nova Scotia when my dad’s aunt made a rhubarb pie.  Since I was probably about 10 years old, I’m pretty sure I turned my nose up and didn’t try a bite.  Funny how both of these things have stuck with me though, huh?

Well, now with my much more sophisticated and refined palate (ha!), I have baked with it a few times and so far, liked everything I’ve made.  Rhubarb is such an interesting vegetable.  It looks like and has the consistency of pretty celery, but almost tastes like a really tart apple, and despite its tartness, is almost always used in sweet recipes rather than savory.  This recipe is obviously no exception.  I am on a strawberry rampage this summer, so I was excited to try this – it gave me a chance to take what I know and love and add something less familiar.  By the way, did you know that rhubarb leaves are toxic??  True story.  Remove and discard please!

Anyway, on to the bars.  I have a coworker who likes to try my new recipes so I brought her one for an opinion….to quote her exactly, “Oh my god, I think this is the best thing you’ve ever made.”  WOW – now that’s a bold claim, especially since she’s had my sour cream coffee cake which I swear by.  Not a minute later, she shouted down the hall, “I want these for my birthday!”  Ha, yes maam, done and done.  I’m convinced it was the addition of my go-to secret ingredient (a spice used often in Scandinavian and Indian cuisine).  I add a little to my apple pies too and it totally brings it up a notch.  Perhaps you can figure out what I’m talking about, but if not – well, some things just need to stay a secret. J    

Here are the details and step-by-step pics:

Ingredients:
1 cup rolled oats
3/4 cup, plus up to 2 Tbsp extra all-purpose flour
1/2 cup light brown sugar
Heaped 1/4 tsp table salt
6 Tbsp unsalted butter, melted
1 tsp cornstarch (optional, but helps firm up the filling)
1 Tbsp lemon juice
1 Tbsp granulated sugar
1 cup small-diced rhubarb (from about 1 1/2 medium stalks)
1 cup small-diced strawberries
Secret Spice (optional)
Powdered sugar, for decoration, if desired

Instructions:
Heat oven to 375º. For easy removal, line bottom and two sides of 8-by-8-inch square baking pan with parchment paper. No need to bother (and no greasing needed) if you plan to serve them right in the pan.  This recipe can be doubled and made in a 9x13 pan (this is what I did).


Rinse and chop rhubarb and strawberries into small dice and set aside.

Place oats, 3/4 cup flour, brown sugar and salt in bottom of baking pan and mix. Pour melted butter over, and stir until clumps form. If the clumps feel soft or look overly damp, add the remaining 2 tablespoons flour (I did). Set aside 1/2 cup of the crumble mixture. Press the rest of the crumb mixture evenly in the bottom of the pan.


Sprinkle the fruit evenly with cornstarch, then lemon juice, and 1/2 tablespoon of granulated sugar. Stir to combine.  Spread fruit over crumb mixture evenly.  Scatter reserved crumbs over fruit and bake bars for 30 to 40 minutes (firmer fruits will take longer – mine took almost the full 40), until fruit is bubbly and crisp portion is golden and smells toasty and amazing.


Let cool in pan; I do this in the fridge, where they become crisp once chilled (less so at room temperature). Cut into squares and sprinkle with powdered sugar before serving. Store leftovers in fridge, if they make it that long.


Recipe adapted from Smitten Kitchen

Tuesday, June 10, 2014

Cookies - Me vs. The Machine


Potbelly.  Who would have thought they would be my cookie-baking nemesis?!  I certainly didn’t.  I figured it would be some great artisanal baker, but no.  I’ve heard from several people over the years about how amaaazing their cookies and ice cream-cookie sandwiches are….blah, blah, blah.

Challenge accepted and nemesis no more, my friends.  I think I have finally conquered their most popular cookie – the oatmeal chocolate chip, of course.

Like a true professional, I did my research over time.  I made tweaks to a recipe I already know and love, I tried a couple new recipes from other blogs, I bought a Potbelly cookie and tried to figure out if there was some secret spice I was missing (Anyone see that Friends episode with Monica dissecting what turned out to be a Nestle Tollhouse recipe??  Yup, same.).  I even emailed Potbelly’s customer service and asked them about their recipe.  I’ll get to their response in a sec.  But finally, I got the golden ticket one day when a weekly email from King Arthur Flour showed up in my inbox featuring their version…bingo.  I should have thought to go to them first.

Here is their recipe:

Ingredients
1 cup (2 sticks) unsalted butter, at room temperature
1 cup light brown sugar, packed
1/2 cup granulated sugar
1 large egg, at room temperature
1 large egg yolk, at room temperature
1 tablespoon vanilla extract
2 cups All Purpose Flour
1 cup quick-cooking or old-fashioned oats 
1 teaspoon baking powder
1 teaspoon baking soda
1 teaspoon kosher salt or 3/4 teaspoon regular table salt
3 cups semisweet chocolate chips
Directions
1) Preheat the oven to 325°F. Line several cookie sheets with parchment paper, or lightly grease with non-stick vegetable oil spray.
2) Beat together the butter and sugars until smooth.
3) Add the egg, egg yolk, and vanilla one at a time, beating well after each.
4) Whisk together the flour, oats, baking powder, baking soda, and salt, and add to the butter mixture in the bowl.
5) Mix until everything is thoroughly incorporated. Scrape the bottom and sides of the bowl, and mix briefly.
6) Stir in the chocolate chips.
7) Scoop the dough onto the prepared baking sheets, leaving about 1 1/2" to 2" between cookies.
8) Bake the cookies for 12 to 15 minutes, until they're a light golden brown, with slightly darker edges. Their middles may still look a tiny bit shiny; that's OK, they'll continue to bake as they cool on the pan.
9) Remove the cookies from the oven, and as soon as they're set enough to handle, transfer them to racks to cool.

As good as this recipe is, I still make my own adjustments to get the texture I want – I use jumbo eggs instead of large, I add some extra oats (about 1/2-3/4 cup), perhaps a pinch more baking soda or powder.  I will say that their use of a full tablespoon of vanilla is unique – don’t skimp on that, it makes all the difference.  And whatever you do, make sure its pure vanilla extract and not imitation.  Ick.

As for Potbelly’s customer service response….well first, I checked their website and it just says that a particular recipe is used and they are baked fresh daily.  Ok fine, but I wanted more than that.  I asked if the dough is actually made on sight or if they just get dough that they bake at each location.  I also asked if the recipe was Potbelly’s or from a third party bakery.  The response (which to their credit, I did receive within 24 hours) was, “They are baked fresh each day from dough which is made according to a Potbelly recipe.”  Hmmm, they get kudos for using their own recipe, but this is still vague enough, and I’ve watched enough “How It’s Made” in my day to guess that this dough arrives at each store in big gallon buckets (likely with added sodium and preservatives) and just gets scooped out and plopped onto baking sheets.  Nothing horribly wrong with that I suppose, but for all the hype they get, you’d hope that there’s at least some skill and passion involved.  Next time you get the craving, come to my kitchen instead….to borrow from Seinfeld – admittedly the context is a bit different – they’re real and they’re spectacular!!
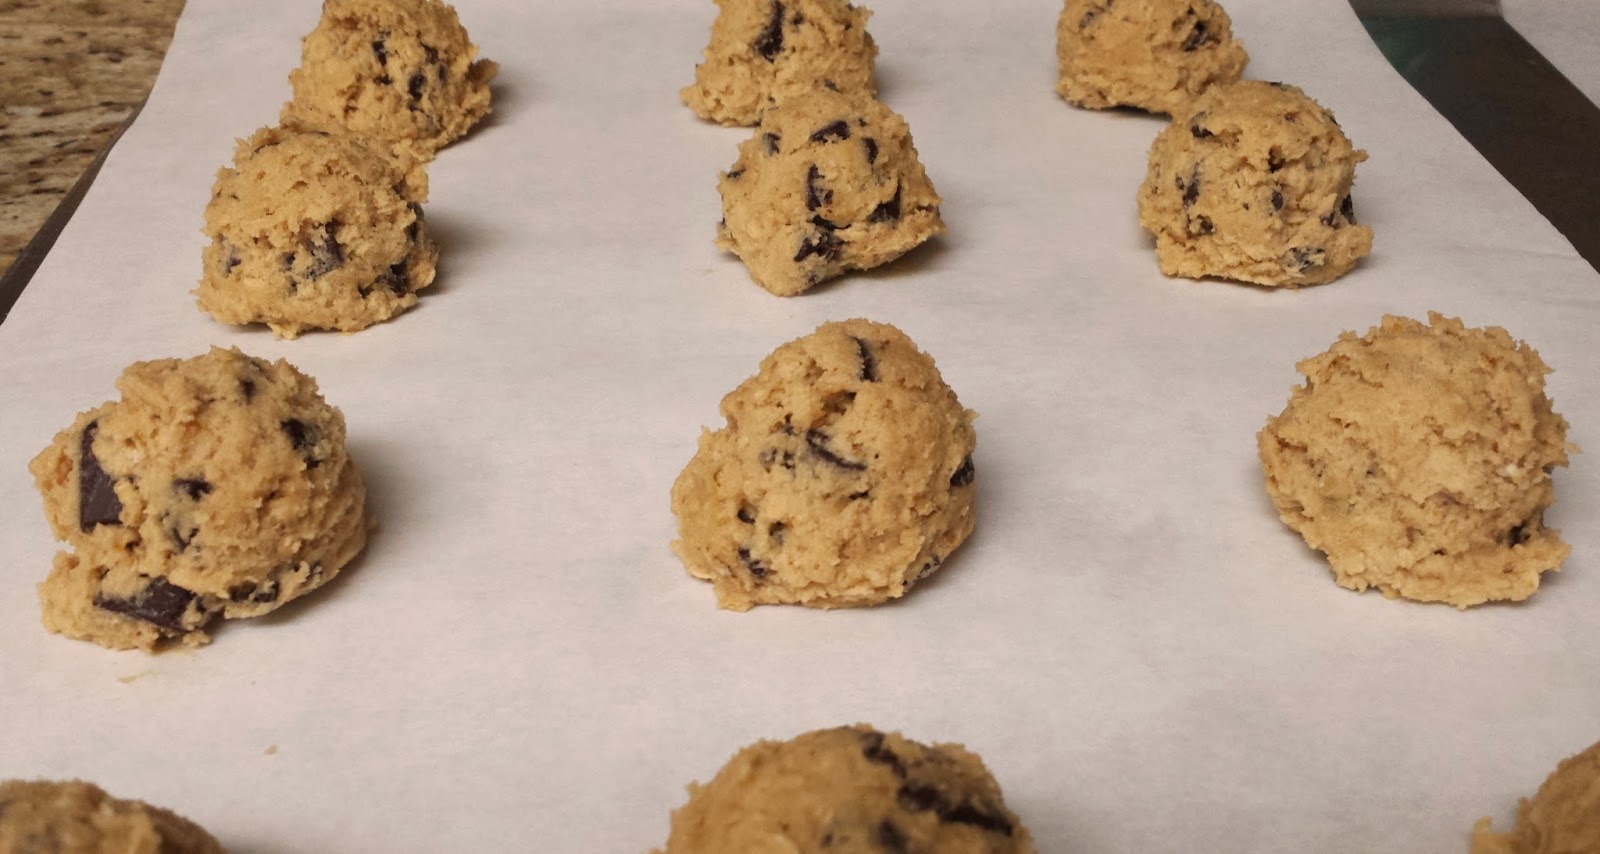
Another batch laying in wait

**Note** – I made these for my Baking GALS Round 31.  While I would love to devour them all myself, I thought it best to get them out of the house immediately and spare my figure.  And no, I did not skip Rounds 29 and 30 – I made repeat cookie and scone recipes the past couple months and therefore didn’t bother boring you with the details.  No worries, the troops were fed!